
Do you include inserts, or "stuffers", in your mailings periodically? Think of an insert as any additional document(s) or paper item in the mailpiece. This may include marketing slicks, disclosures, special notifications, etc.. In order to calculate an accurate mailpiece weight / thickness it is imperative that AutoMail® have a means of calculating this additional weight / thickness as it is not a consistent part of a mailing or mailpiece. Insert Setup allows you to do just that.
Enable Inserts for all mailpieces
| 1. | Count 100 pieces of the insert / stuffer you wish to add to a mailing. |
| 2. | Weigh those 100 pieces using a calibrated scale (your meter machine scale is the most obvious trusted device). |
| 3. | With a standard ruler, measure the general "thickness" of these 100 inserts / stuffers. |
| o | Do not mash the stack in any way. Simply measure, as-is, in the middle of the stack. |
|
| 2. | Click Insert Setup in the Batch Menu |
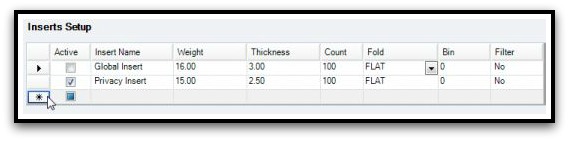
| 3. | Click on a new row / record. For example, click on the asterisk on the far left as shown in the graphic below. |
| 4. | Type any descriptor in Insert Name. |
| 5. | Enter Weight (always in oz.) of stack of 100 insert pieces, as pre-determined. |
| 6. | Enter Thickness, as pre-determined. |
| a. | If insert will NOT be folded again, by folding / inserting machine, before inserted in envelope ...select FLAT. |
| b. | If insert WILL be folded by folding / inserting machine ...select either BI-FOLD or TRI-FOLD accordingly. |
| c. | Bin is only applicable to Selective Inserting. |
| d. | Filter is only applicable to Selective Inserting |
| 9. | IMPORTANT: Remember to disable any inserts when a future mailing does not warrant them. |
| o | See Inserts on the Batch Summary screen. This demonstrates whether or not functionality for Inserts is enabled and whether or not a specific Insert(s) is selected. |
|
|
Enable Inserts for Select Mailpieces
Maybe you only wish to apply inserts to particular documents in your mailing? AutoMail® can apply additional weight / thickness / postage for inserts which only apply to "selective" documents. This is Selective Inserting.
|
| 1. | Refer to procedures in How do I record the above results in AutoMail® above. |
| 2. | Select  at the bottom of the Insert Setup screen. at the bottom of the Insert Setup screen. |
| 3. | This view is displayed after you select Insert Filters. As indicated earlier, you will click the left-side asterisk in order to set up a new filter specification. 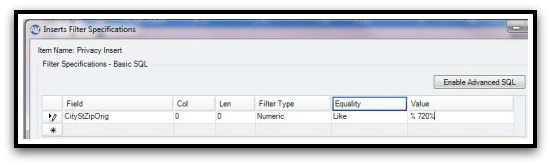 |
| 4. | When setting up a Selective Insert the field may “change” …depending upon what is being used as a filter. To clarify… there may be a “hold code” or may be a “Name 1” field that AutoMail Pro® will “key from” in order to determine whether or not to apply an insert for a given document / mail-piece. In the scenario used here… we want to apply a marketing message (insert) based on anyone that has a zip code starting with 720__. |
| ▪ | Field: This would be ‘CityStZipOrig’, as you are searching for a specific zip code. |
| ▪ | Col: Review the legend, at the bottom of the ‘Insert Filter Specifications’ screen. If earching the entire filed select 0. |
| ▪ | Len: In this example,the same as ‘Col’. |
| ▪ | Filter Type: Numeric; as the Value being searched for is a number. If searching for a letter or, name, use the ‘Alpha’ Filter Type. |
| ▪ | Equality: In this example, use the ‘LIKE’ qualifier, which requires the value to start and end with a %. If NOT using the ‘LIKE’ qualifier… simply place the keyword / key-value in the value field without extra symbols before or after the keyword. |
| ▪ | Value: Must begin, and end, your search with a %. As an example …I want AutoMail Pro® to find any value of “720” in the Zip Code. Therefore, I want AutoMail Pro® to find a zip of 72089, but NOT a Zip Code such as “24720”. The way to accomplish this is to add a space right after the first, or preceeding, % so that a space is necessary before the 720; which is not a “true” condition with a Zip Code such as 24720. So, the search looks like this: 720%. |
| 5. | Using the scenario just above, when Insert Filter Specifications is configured it should look like the graphic to the right. |
| 6. | Click OK to close / save the Filter Specifications window.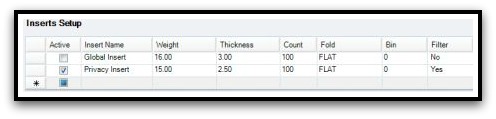 |
| 7. | The Filter column of your selected Insert should now indicate Yes. |
| 8. | Ensure you check the Active box next to your desired Insert |
| 1. | IMPORTANT: Remember to disable any inserts when a future mailing does not warrant them. |
|
