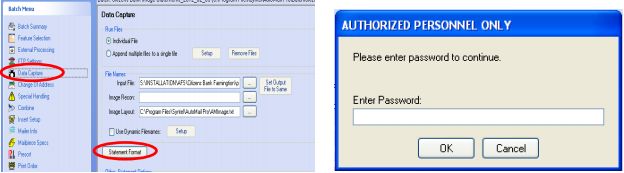
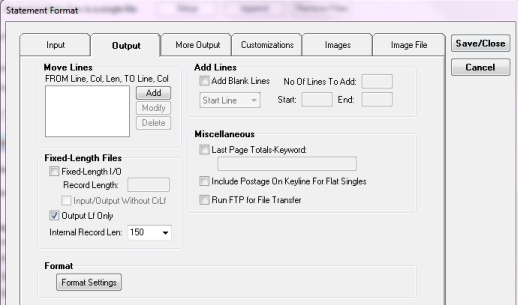
After entering the password, you will see the ‘Statement Format’ window. We will be discussing the
‘Input’ tab in this section.

The ‘Input’ tab is the area of the program used to identify statement and page separators. Automail
must be able to determine where a statement changes compared to simply a page change. The purpose
of this is so that Automail can correctly determine the proper weight and postage to apply to each
statement. The resulting information will print on the printed statement. Let’s begin by discussing the
‘Statement Type:’

| • | The ‘Statement Type’ is used to indicate the file structure you will be using. There are multiple options here. What is chosen will typically be based on the core software or the image vendor that the customer uses. Keep in mind that this may not always be the case. Some of the types will be used everytime for certain vendors. If you are unsure of what ‘Type’ to use, please ask a AutoMail technician. They may have setup the type of file you are working on before. |
| • | The next option is ‘Image Type:’. The same description and senerios also apply here as it does with ‘Statement Type:’ The majority of configurations will require this option to be set to ‘None’, but there are circumstances which require this to be changed. Simply ask a AutoMail technician if you are unsure of what to use. |
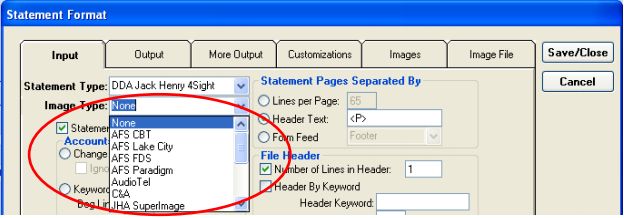
| • | The next option you will see is ‘Statement Verification’. |
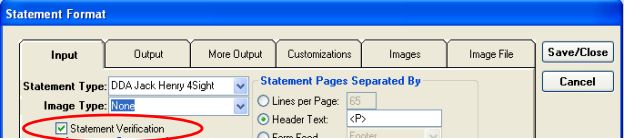
| • | ‘Statement Verification’ was added to the program simply to verify that the output file that Automail creates matches the statement file that was processed. If for some reason Automail modifies the format of the file, (only done in exceptional scenarios, if absolutely necessary) it can cause problems when the file is imported back into the vendor software that is being used to print the statements. |
Now that you have seen how to set the type of statement file that Automail will be processing, Automail must now be configured to know the difference as to when a new statement begins vs.a new page begins. Because Automail prints the weight of each statement on the first page of the statement, the software must know how many pages each statement has. This information is also necessary when Automail is responsible for printing. (discussed in another section) Let’s begin by setting up Automail to separate the accounts within the file.
Accounts Separated By
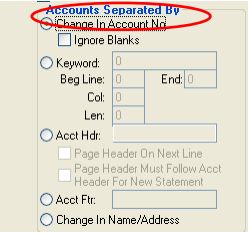
| • | As you will see, there are 5 options that can be used to determine when a new statement begins within the statement file. Keep in mind, the option that you choose will be based on the format of the file you are configuring. The first option is ‘Change In Account No’. (Entering the location of the account number will be discussed in the next section.) |
| • | This option is typically used when then there is nothing specific that designates the first page of a new statement. It can also be used if the file has multiple statements with the same account number and they need to be placed in the same envelope. |
| • | The ‘Ignore Blanks’ option is used when you are separating statements by account number but the additional pages of a statement do not have an account number listed. This tells the software to not treat the blank area as a change in the account number, but to include it as an additional page of the current statement. |
| • | The next option that can be used is ‘Keyword:’. This option is used when there is specific text that designates the first page of a statement (for example: Page 1). If this text is on the first page of every account you can designate the location of this text, which prompts the software to begin calculating a new statement each time this text is found. |
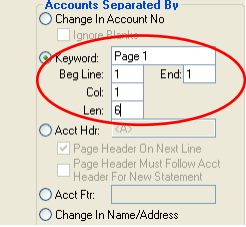
| • | As you will see in the above illustration, you have to designate the specific location of the text within the file. |
| o | Begin by designating the text to be used. EX. Page 1 |
| o | Enter the line number where the text is located. As you can see there is a beginning and ending position. This will be used if the text floats from line to line. (Carefully watch the effects this has on the file. If the text moves, it can affect the output results.) |
| o | Designate the column location of the text. You can find this information in the text editor that you are using to view the file. |
| o | Enter the length of the text. In the above example, the text is 6 characters long. This must be exact. |
| • | The next option that may be used is ‘Acct Hdr:’. |
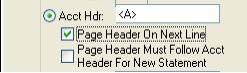
| • | The ‘Acct Hdr:’ option will typically be used for specific vendors. In the example above, the <A> is being used in a file created for the Jack Henry 4Sight vendor. <A> represents the start of a new statement. As you can see there is no need to specify line and page number. Automail is programmed to look at the first line of text in the file for the specified text. |
| • | The options of ‘Page Header On Next Line’ and ‘Page Header Must Follow Acct Header For New Statement’ are used mainly for specific vendors or file formats. Some statement might have the <A>, (or some other text) on every page, but there may be a <P>, (or some other text) following the <A> on the first page that specifies the first page of a statement. |
| • | There is no definitive way to determine every vendor that requires this setup. You have to be able to base your decision on what you see in the file and learn from other technicians who have dealt with this setup. |
| • | The next option that is available to use is ‘Acct Ftr:’. |
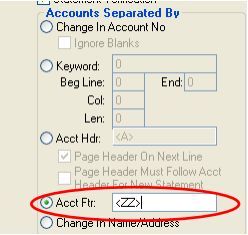
| • | The ‘Acct Ftr:’ option is very rarely used. You will not see many files that require this option. However, it does occur. Some statement files will have the first page indicator at the bottom of the page instead of the beginning. Once again this will be vendor specific as Automail will be programmed to understand the specific position of the text in order to properly process the statement text that is above the footer text. |
| • | The final option used to separate accounts will be ‘Change in Name/Address’. |
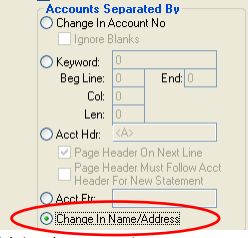
| • | This option will be used mainly in only two scenerios. |
| o | First scenario is when there is no other option to separate accounts. If none of the previous options are available to use, then this option may be used as there will always be address information available. |
| o | The second scenario is when you want to put different statements that have the same address information into the same envelope to mail. Maybe the address information is the same but the account number is different, then this option can be used to combine the statements. |
| • | Be very careful using this option. It is recommended that this only be used with non-imaged statements. If you try to use this for imaged statements, you run the risk of causing issues with image vendor software. Mainly, it can cause the image vendor software to incorrectly group the correct images with the correct customer statement |
Account No.
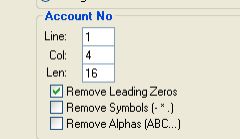
| • | This section is used to extract the account number from the statement file. The main purpose of this feature is for reporting. However, there are some vendors that in order to calculate images correctly, Automail must match the account number in the statement file with the account number that is in an image file created by the vendor. |
| • | The account number will be located in different positions according to the file type and vendor that created the file. You will see that there are some vendor files that the account number is in the same position in every file they produce and there are some that it will be in different positions for different customers. |
The next section in the ‘Statement Format’ is the ‘Statement Pages Separated By’ section.
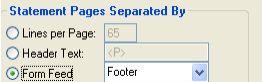
| • | This section is used to tell Automail the method used to separate the pages in a statement file. |
There are three options that can be used to do this.
| o | ‘Lines per Page:’ -This option if very rarely used. It would typically only be used when there is no other option available. The pages within the statement file must have the same number of lines per page in order for this option to function correctly. |
| o | ‘Header Text:’ –This option functions much in the same way the ‘Keyword’ option does in the ‘Accounts Separated By’ section to separate statements. However, this text must be at the beginning of each page. There is no way to define a specific position so Automail will look at the beginning of each page. |
| o | ‘Form Feed’ – This has two possible settings. |
| i. | ‘Header’ – Form feed will be place at the beginning of each page |
| ii. | ‘Footer’ – Form feed will be place at the bottom of each page. |
| o | Form feeds can be tricky. You must be able to properly determine whether a form feed is a header or footer based on how they are positioned in the file at the beginning and end of the file. If you need help, ask another technician. |
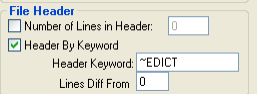
File Header
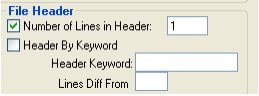
| • | Some statement files that are produced have extra lines at the beginning of the file. These lines only exist before the first statement. When specifying your text locations, Automail does not need to count these as it will cause your location settings to be incorrect for everything after your first statement. Automail must be set to not count these lines. There are two ways to do this. |
| o | Number of Lines in Header:’ – This option is used if the number of extra lines is specific and will always remain the same. |
| o | ‘Header By Keyword’ – This option is used if the number of extra lines will change on a ‘per file’ basis. Ex: ITI Director. |
| ▪ | If the number of lines change but the last line always has specific text, then this option will work. For example, ITI files always will say ~EDICT on the last header line. In this case this will be entered into the ‘Header Keyword:’ field. The number ‘0’ will then be entered into the ‘Lines Diff From’ field. |
Name/Address Start Position
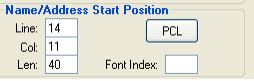
| • | This section is used to extract the address data from the statement file. One of Automail’s functions is to position the address in the file that allows it to be visible in the window of the envelope being used to mail the statement. In order to do this, Automail must know the exact position of the address. |
| • | Another function of Automail is to verify the accuracy of the address using the CASS database provided by the USPS. This function takes the address listed in the statement file and compares it to the USPS database. |
Address Service Change
| • | This section is not used in Automail Pro 7. |
Import Defaults
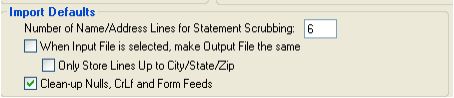
| • | The options in this section will vary depending on the situation you are dealing with. The first option tells Automail how many lines of address to process. This can vary depending on the statement file layout. |
| • | The next option, ‘When Input File is selected, make Output File the same’ is used when the output file that Automail is created must be the same as the input file being processed. This will overwrite the input file and replace it with the output file. |
| • | ‘Clean-up Nulls, CrLf and Form Feeds is used by Automail to remove any additional items not needed by the system. |
Define Fields for Filters
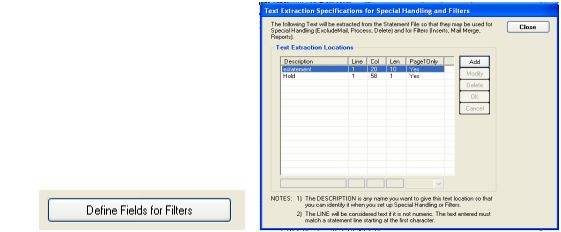
| • | Define Fields for Filters is used in different situations which are discussed in other sections of this manual. The function of it however, is to define a specific location of text that can be extracted by Automail for different purposes. Some of the uses of this are: setting up excludes or defining pages for Automail controlled printing. |
This is the end of the ‘Statement Format’ section. Next topic that will be discussed is the ‘Output’ tab.
|